
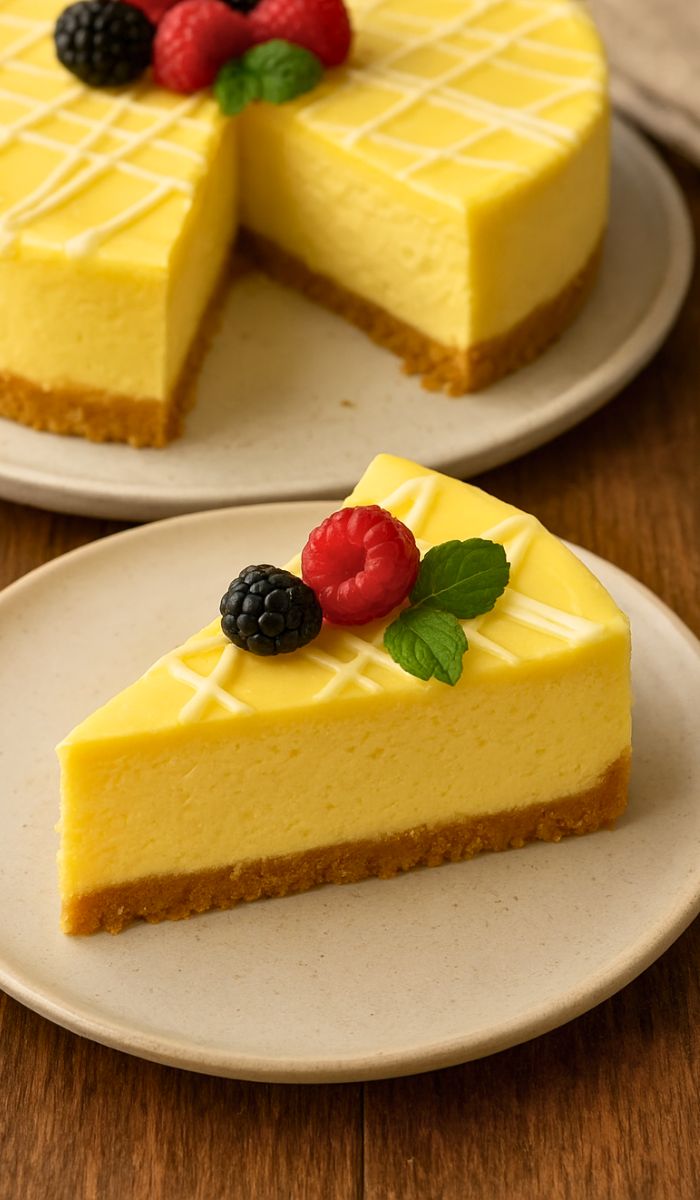
If you love creamy desserts, this Yellow Velvet White Chocolate Cheesecake Recipe is perfect. It is soft, rich and full of flavor. The cheesecake has a beautiful yellow color with white chocolate mixed in.
Every bite melts in your mouth. You don’t need to be an expert to make it. With simple steps and easy ingredients, anyone can bake it at home. This recipe is ideal for birthdays, parties, or just a sweet treat.
In this post, you will learn how to make Yellow Velvet White Chocolate Cheesecake and all the ingredients for Yellow Velvet White Chocolate Cheesecake you need.
My Experience With This Recipe
The first time I baked this cheesecake, I was amazed. The texture was creamy and smooth. The white chocolate added extra sweetness without being too rich. The yellow color looked beautiful on the plate.
My family loved it and it disappeared quickly. I also enjoyed how easy the recipe was. You don’t need many tools or fancy skills. Baking this cheesecake felt fun and rewarding. Now, it is one of my favorite desserts to make for friends and family.
Recipe Card Info
- Recipe Name: Yellow Velvet White Chocolate Cheesecake
- Servings: 8
- Prep Time: 20 mins
- Cook Time: 50 mins
- Total Time: 1 hour 10 mins
- Course: Dessert
- Cuisine: American
- Calories: 420 kcal per serving
Equipment List
- 9-inch springform pan
- Mixing bowls
- Electric mixer or hand whisk
- Measuring cups and spoons
- Spatula
- Saucepan for melting chocolate
- Parchment paper
- Cooling rack
Ingredients You Need for Yellow Velvet White Chocolate Cheesecake
- 200 g graham crackers, crushed
- 100 g unsalted butter, melted
- 500 g cream cheese, softened
- 200 g white chocolate, chopped
- 1 cup sugar
- 3 large eggs
- 1 tsp vanilla extract
- 1/2 cup sour cream
- 1 tsp yellow food coloring
- Pinch of salt
Step-by-Step Guide
- Prepare the Crust
Mix crushed graham crackers with melted butter. Press into the bottom of a springform pan evenly. - Melt White Chocolate
Use a saucepan or microwave. Stir often until chocolate is smooth and fully melted. - Beat Cream Cheese
Place cream cheese in a bowl. Beat with sugar until smooth and creamy. - Add Eggs
Add eggs one by one to cream cheese. Beat well after each addition. - Mix White Chocolate
Add melted white chocolate to cream cheese. Stir gently until fully combined. - Add Sour Cream
Mix in sour cream and vanilla extract. Make batter smooth and silky. - Add Yellow Color
Add yellow food coloring. Stir until batter has bright yellow color. - Pour Into Pan
Pour cheesecake batter over prepared crust evenly. Smooth top with spatula. - Bake the Cheesecake
Preheat oven to 160°C (320°F). Bake cheesecake for 50 minutes until slightly firm. - Cool Completely
Turn off oven. Leave cheesecake inside for 15 minutes. Then cool at room temperature. - Chill in Fridge
Refrigerate cheesecake for at least 4 hours or overnight before serving. - Serve and Enjoy
Remove cheesecake from pan. Slice carefully. Serve with fruit or chocolate drizzle.
Tips to Make the Best Yellow Velvet White Chocolate Cheesecake
- Use room temperature cream cheese for smooth batter.
- Melt chocolate slowly to avoid burning.
- Don’t overmix eggs to keep cheesecake fluffy.
- Chill properly to get firm slices.
Common Mistakes to Avoid
- Overbaking; cheesecake can crack.
- Using cold cream cheese; batter will be lumpy.
- Skipping sour cream; texture will be less creamy.
- Not pressing crust firmly; it may crumble.
Serving Suggestions
Serve this cheesecake with fresh berries, whipped cream or a drizzle of white chocolate. It pairs well with coffee or tea.
Use decorative plates for a beautiful presentation. Great for birthdays, holidays or special dinners.
Variations You Can Try
- Swap white chocolate with milk chocolate.
- Add lemon zest for a citrus flavor.
- Use chocolate cookie crust instead of graham crackers.
- Top with caramel or berry sauce for extra sweetness.
Storage and Reheating Tips
- Store in the fridge in an airtight container.
- Keeps well for 3–4 days.
- Do not freeze if possible; texture may change.
- Slice with a warm knife for clean cuts.
Nutrition Information
| Nutrient | Amount per serving |
|---|---|
| Calories | 420 kcal |
| Protein | 7 g |
| Carbs | 35 g |
| Fat | 28 g |
| Fiber | 1 g |
Health Benefits
This cheesecake provides protein from cream cheese and eggs. White chocolate adds energy. While rich, it can be part of a balanced diet when eaten in moderation. Using real ingredients makes it wholesome and satisfying.
Yellow Velvet White Chocolate Cheesecake Recipe
Ingredients
- 200 g graham crackers crushed
- 100 g unsalted butter melted
- 500 g cream cheese softened
- 200 g white chocolate chopped
- 1 cup sugar
- 3 large eggs
- 1 tsp vanilla extract
- 1/2 cup sour cream
- 1 tsp yellow food coloring
- Pinch of salt
Instructions
Prepare the Crust
- Mix crushed graham crackers with melted butter. Press into the bottom of a springform pan evenly.
Melt White Chocolate
- Use a saucepan or microwave. Stir often until chocolate is smooth and fully melted.
Beat Cream Cheese
- Place cream cheese in a bowl. Beat with sugar until smooth and creamy.
Add Eggs
- Add eggs one by one to cream cheese. Beat well after each addition.
Mix White Chocolate
- Add melted white chocolate to cream cheese. Stir gently until fully combined.
Add Sour Cream
- Mix in sour cream and vanilla extract. Make batter smooth and silky.
Add Yellow Color
- Add yellow food coloring. Stir until batter has bright yellow color.
Pour Into Pan
- Pour cheesecake batter over prepared crust evenly. Smooth top with spatula.
Bake the Cheesecake
- Preheat oven to 160°C (320°F). Bake cheesecake for 50 minutes until slightly firm.
Cool Completely
- Turn off oven. Leave cheesecake inside for 15 minutes. Then cool at room temperature.
Chill in Fridge
- Refrigerate cheesecake for at least 4 hours or overnight before serving.
Serve and Enjoy
- Remove cheesecake from pan. Slice carefully. Serve with fruit or chocolate drizzle.
Notes
- Use room temperature cream cheese for smooth batter.
- Melt chocolate slowly to avoid burning.
- Don’t overmix eggs to keep cheesecake fluffy.
- Chill properly to get firm slices.
FAQs about Yellow Velvet White Chocolate Cheesecake
Q1: Can I use ready-made crust for this cheesecake?
Yes, store-bought crust works well. It saves time and still tastes delicious.
Q2: How do I avoid cracks on the cheesecake top?
Bake at low temperature and avoid overmixing. Cool slowly to prevent cracks.
Q3: Can I make this cheesecake vegan?
Yes, substitute cream cheese and eggs with plant-based alternatives. Melt white chocolate vegan style.
Q4: How long can I store this cheesecake?
Refrigerated in an airtight container, it lasts up to 4 days.
Q5: Can I add fruit inside the cheesecake?
Yes, swirl in berries or fruit puree for extra flavor and color.
Final Thoughts
This Yellow Velvet White Chocolate Cheesecake Recipe is creamy, sweet and easy to make. Perfect for any celebration or sweet craving. The yellow color is vibrant and white chocolate adds richness.
It’s simple, fun and impressive. Try this recipe at home and enjoy every delicious bite. Everyone will love it.

Hi, I’m Emily Grace! I love cooking simple, tasty food that brings people together. On Bite Dive, I share easy recipes, fun food tips, and ideas to make every meal special. My kitchen is my happy place, and I’m so excited to share it with you!