
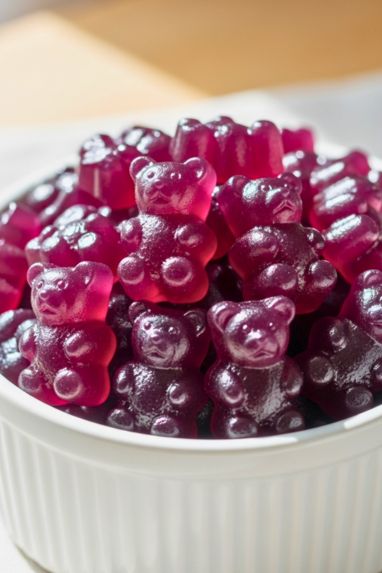
The Elderberry Gummies Recipe is sweet, fun and healthy. These gummies are made with elderberry syrup, which helps your body stay strong.
Both kids and adults will love them. You can eat them as a snack or for daily health. Making elderberry gummies at home is very easy.
You don’t need any special tools or cooking skills. You only need a few things from your kitchen. In this post, you will learn how to make elderberry gummies step by step.
The recipe is simple, tasty and full of goodness. Let’s make these cute and healthy gummies together!
Why You’ll Love This Elderberry Gummies Recipe
You will love this Elderberry Gummies Recipe because it is quick and simple. The gummies taste sweet and fruity.
They look nice and are fun to eat. You can make them in any shape you like. Kids enjoy them too. They are great for your immune system.
Homemade gummies are better than store ones. They have no fake color or sugar. You can make them with honey and real elderberry syrup.
Recipe Card Info
- Recipe Name: Elderberry Gummies Recipe
- Servings: 24 gummies
- Prep Time: 10 mins
- Cook Time: 5 mins
- Total Time: 15 mins
- Course: Snack / Desserts
- Cuisine: American
- Calories: 15 kcal per serving
Equipment List
- Small saucepan
- Measuring cups and spoons
- Whisk or spoon
- Silicone gummy molds
- Dropper or small spoon
- Mixing bowl
Ingredients You Need for Elderberry Gummies Recipe
- 1 cup elderberry syrup (homemade or store-bought)
- ¼ cup raw honey
- 3 tablespoons unflavored gelatin powder
- ½ cup warm water
You can add a few drops of lemon juice if you like.
Step-by-Step Guide
1. Warm the Elderberry Syrup
Pour elderberry syrup into a small saucepan. Heat it on low flame. Do not boil it. Just make it warm enough to mix.
2. Mix the Gelatin
Take a small bowl and add warm water. Sprinkle gelatin powder on top. Let it rest for 1–2 minutes. It will turn thick and soft.
3. Combine Both Mixtures
Pour the soft gelatin mix into the warm elderberry syrup. Stir slowly with a whisk. Mix until smooth and shiny.
4. Add Honey
Turn off the heat. Add honey to the mix and stir well. Honey makes the gummies sweet and helps keep them fresh.
5. Pour into Molds
Use a spoon or dropper to fill the gummy molds. You can make fun shapes like bears, hearts, or stars. Don’t overfill.
6. Chill the Gummies
Put the molds in the fridge for 2 hours. When the gummies are firm, remove them carefully.
7. Store and Enjoy
Your elderberry gummies are ready! Keep them in a clean glass jar in the fridge.

Tips to Make the Best Elderberry Gummies Recipe
- Use real elderberry syrup for good flavor.
- Do not boil the syrup, or it will lose nutrients.
- Use silicone molds for easy removal.
- Add more or less honey as you like.
- Make sure gelatin is fresh for soft gummies.
Serving Suggestions
You can eat these gummies anytime. Eat one or two each morning to stay healthy. Kids can enjoy them as a fun snack. You can also carry them while traveling. They taste best when cold and fresh.
Storage and Reheating Tips
Put the gummies in a tight container and store them in the fridge. They stay fresh for about two weeks. Do not freeze them, or they will become hard. If they get too firm, keep them out for 5 minutes before eating.
Nutrition Information
| Nutrient | Amount per serving |
|---|---|
| Calories | 15 kcal |
| Carbohydrates | 4 g |
| Protein | 1 g |
| Sugars | 3 g |
| Fat | 0 g |
These values may change a little depending on your ingredients.
Health Benefits
Elderberries have vitamins and antioxidants that help fight colds. Gelatin is good for your skin and joints. Honey soothes your throat and gives energy.
These gummies are tasty and healthy. Eating one or two each day can help your immune system stay strong.
Elderberry Gummies Recipe
Ingredients
- 1 cup elderberry syrup homemade or store-bought
- ¼ cup raw honey
- 3 tablespoons unflavored gelatin powder
- ½ cup warm water
You can add a few drops of lemon juice if you like.
Instructions
Warm the Elderberry Syrup
- Pour elderberry syrup into a small saucepan. Heat it on low flame. Do not boil it. Just make it warm enough to mix.
Mix the Gelatin
- Take a small bowl and add warm water. Sprinkle gelatin powder on top. Let it rest for 1–2 minutes. It will turn thick and soft.
Combine Both Mixtures
- Pour the soft gelatin mix into the warm elderberry syrup. Stir slowly with a whisk. Mix until smooth and shiny.
Add Honey
- Turn off the heat. Add honey to the mix and stir well. Honey makes the gummies sweet and helps keep them fresh.
Pour into Molds
- Use a spoon or dropper to fill the gummy molds. You can make fun shapes like bears, hearts, or stars. Don’t overfill.
Chill the Gummies
- Put the molds in the fridge for 2 hours. When the gummies are firm, remove them carefully.
Store and Enjoy
- Your elderberry gummies are ready! Keep them in a clean glass jar in the fridge.
Notes
- Use real elderberry syrup for good flavor.
- Do not boil the syrup, or it will lose nutrients.
- Use silicone molds for easy removal.
- Add more or less honey as you like.
- Make sure gelatin is fresh for soft gummies.
FAQs about Elderberry Gummies Recipe
Q1: Can I use vegan gelatin?
Yes, you can use agar powder. The gummies may feel a bit different.
Q2: How long do gummies last?
They stay fresh for two weeks in the fridge. Keep them closed tightly.
Q3: Can I use sugar instead of honey?
Yes, but honey is better and healthier.
Q4: Are these gummies safe for kids?
Yes, safe for kids over two years old.
Q5: Can I add vitamin C powder?
Yes, add a small amount after turning off the heat.
Final Thoughts
The Elderberry Gummies Recipe is a fun way to stay healthy. These chewy treats are easy to make and taste great.
They look cute and are full of goodness. You can make them in a short time and store them for days. Making them at home is cheaper and better than buying from stores.
Try this Elderberry Gummies Recipe today and share it with your family. Once you make them, you’ll love them forever!

Hi, I’m Emily Grace! I love cooking simple, tasty food that brings people together. On Bite Dive, I share easy recipes, fun food tips, and ideas to make every meal special. My kitchen is my happy place, and I’m so excited to share it with you!